Spa-Side Sleek
 By Paolo Benedetti
To me, there's no watershape more relaxing or intrinsically beautiful than a well-designed, well-appointed spa. The combination of warmth, immersion and jet action is enough to knock the edge off the roughest day, and I've always found that conversation comes more easily when I'm neck-deep in bubbling water.
This is why, many years ago, I began focusing on aesthetic details related to the visible working components of spas and have found a number of ways to hide controls, jets and suction points to make them blend into their surroundings. I'll address jets and suction fittings in another article. This time, I'll deal with spa controls and making them disappear from view.
Vanishing Act
Having spa controls within easy reach of the water may well be essential to full spa enjoyment, but having them intrude visually on my clients' good time is another matter. I can't stand the little dark rectangles on decks, and don't even get me started on spas where the builder puts the controller just above the surface in the waterline tile.
 I'm not saying that these important devices are poorly designed or intrinsically ugly. Rather, I object to this: Where they are installed without consideration, they can make a great installation seem ordinary simply by virtue of making the eye trip over them every time it surveys the scene (Figure 1).
In that sense - and as is the case with the majority of my acts of concealment - I am working with the fact that my clients spend only a small fraction of their time actually using the watershapes I've prepared for them, and a much greater amount of time just observing them as parts of spaces I've composed. Where I have control, I make anything that interrupts a casual visual survey go away.
In the case of spa controls, this task is fairly easy. It starts during construction, when we stub up two conduits where the spaside control will be positioned. One conduit (usually polyethylene or drip-irrigation tubing a half-inch in diameter) is simply a drain line that runs to a pocket of drain rock underneath the spa or the nearby decking. (The amount of water that will actually be drained is minuscule.)
The second conduit carries the wiring for the controller. I typically use a one-inch conduit to make wire-pulling easier: It doesn't cost much more than smaller sizes and can save lots of time and effort.
An Easy Cover-Up
With coping systems of either stone or concrete, my masons carefully cut out a niche of sufficient depth to allow the top surface of the spaside remote to sit just below the level of the finish material - allowing, of course, for the thickness of the lid we'll fabricate to cover the keypad.
 Once the masons are done, we cut the drain tubing flush to the "floor" for unimpeded flow away from the niche. Then we cut the wiring conduit down so that it stands about a quarter-inch proud of the floor and install the remote in the niche.
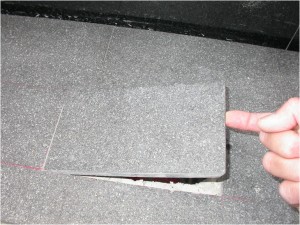
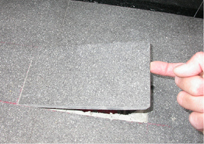
 Just to be certain there's no contact between the lid and the keypad, we grind away a portion of the underside of the lid. Then we grind a "finger cup" on the underside of the lid along with a matching detail on the coping (Figure 2).
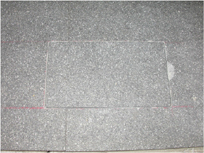
Once in place, the keypad is both accessible and practically invisible (Figure 3). In its hidden state, the remote is less accessible to little fingers that like to push buttons, is shielded from degradation by ultraviolet light and won't spoil the mood by glowing into a nighttime scene. As I see it, for the limited amount of actual use the keypad will see during its lifespan, there is no reason at all to leave it, exposed and visually intrusive, on the deck for all to see.
